[!info] mihomo-meta 简介
mihomo 是 clash 的一个分支,也是目前使用最广泛的分支,各平台许多客户端使用的核心均为 mihomo,或者它曾经还有个可能更多人听过的名字叫
mihomo meta。需要说明的是 mihomo 与最原始的 clash 本身都是一个纯命令行程序,这意味着它本身没有图形界面,但本文会讲到如何配置 mihomo 的 webUI,以便日常使用。
mihomo仓库:
mihomo文档:
metaacybexd仓库:
Mihomo 配置文件撰写
新建文本文档config.yaml ,参考官方文档编写mihomo的配置文件。
第 1 行为代理端口设置,第 6 行为外部控制端口设置(如使用 webUI 控制 mihomo)如有需要可自行更改。
注意连接后端时应填入external-controller 字段指定的端口。
proxy-providers 项必须依照自己实际情况修改,修改之后不包含“${}” 字样。具体替换指南已置于代码注释。
mixed-port: 7890                       # 代理端口设置
ipv6: true
allow-lan: true
unified-delay: false
tcp-concurrent: true
external-controller: 127.0.0.1:9090    # 外部控制端口设置(如使用 webUI 控制 mihomo)如有需要可自行更改
external-ui: ui
external-ui-url: "https://github.com/MetaCubeX/metacubexd/archive/refs/heads/gh-pages.zip"

# url 里填写自己的订阅,名称不能重复
proxy-providers:
  ${节点1提供者名称}:         #将“${节点1提供者名称}”替换为提供该节点厂家名称或自定义别名
    url: "${节点1订阅连接}"   #将"${节点1订阅连接}"替换为提供者给出的订阅连接
    type: http
    interval: 86400
    health-check: {enable: true,url: "https://www.gstatic.com/generate_204", interval: 300}
    override:
      additional-prefix: "${节点1提供者名称}"   #同样替换

  ${节点2提供者名称}:         #如果有第二个订阅链接,可仿照第一个供应链接替换${}内容,若无可删除此段
    url: "${节点2订阅连接}"
    type: http
    interval: 86400
    health-check: {enable: true,url: "https://www.gstatic.com/generate_204",interval: 300}
    override:
      additional-prefix: "${节点2提供者名称}"

                               #若有三个及以上供应链接,可仿照上段继续添加段落
proxies:
  - name: "直连"
    type: direct
    udp: true

geodata-mode: true
geox-url:
  geoip: "https://github.com/MetaCubeX/meta-rules-dat/releases/download/latest/geoip-lite.dat"
  geosite: "https://github.com/MetaCubeX/meta-rules-dat/releases/download/latest/geosite.dat"
  mmdb: "https://github.com/MetaCubeX/meta-rules-dat/releases/download/latest/country-lite.mmdb"
  asn: "https://github.com/MetaCubeX/meta-rules-dat/releases/download/latest/GeoLite2-ASN.mmdb"

find-process-mode: strict
global-client-fingerprint: chrome

profile:
  store-selected: true
  store-fake-ip: true

sniffer:
  enable: true
  sniff:
    HTTP:
      ports: [80, 8080-8880]
      override-destination: true
    TLS:
      ports: [443, 8443]
    QUIC:
      ports: [443, 8443]
  skip-domain:
    - "Mijia Cloud"
    - "+.push.apple.com"

tun:
  enable: true
  stack: mixed
  dns-hijack:
    - "any:53"
    - "tcp://any:53"
  auto-route: true
  auto-redirect: true
  auto-detect-interface: true

dns:
  enable: true
  ipv6: true
  enhanced-mode: fake-ip
  fake-ip-filter:
    - "*"
    - "+.lan"
    - "+.local"
    - "+.market.xiaomi.com"
  default-nameserver:
    - tls://223.5.5.5
    - tls://223.6.6.6
  nameserver:
    - https://doh.pub/dns-query
    - https://dns.alidns.com/dns-query

proxy-groups:

  - name: 默认
    type: select
    proxies: [自动选择,直连,香港,台湾,日本,新加坡,美国,其它地区,全部节点]

  - name: Google
    type: select
    proxies: [默认,香港,台湾,日本,新加坡,美国,其它地区,全部节点,自动选择,直连]

  - name: Telegram
    type: select
    proxies: [默认,香港,台湾,日本,新加坡,美国,其它地区,全部节点,自动选择,直连]

  - name: Twitter
    type: select
    proxies: [默认,香港,台湾,日本,新加坡,美国,其它地区,全部节点,自动选择,直连]

  - name: 哔哩哔哩
    type: select
    proxies: [默认,香港,台湾,日本,新加坡,美国,其它地区,全部节点,自动选择,直连]

  - name: 巴哈姆特
    type: select
    proxies: [默认,香港,台湾,日本,新加坡,美国,其它地区,全部节点,自动选择,直连]

  - name: YouTube
    type: select
    proxies: [默认,香港,台湾,日本,新加坡,美国,其它地区,全部节点,自动选择,直连]

  - name: NETFLIX
    type: select
    proxies: [默认,香港,台湾,日本,新加坡,美国,其它地区,全部节点,自动选择,直连]

  - name: Spotify
    type: select
    proxies:  [默认,香港,台湾,日本,新加坡,美国,其它地区,全部节点,自动选择,直连]

  - name: Github
    type: select
    proxies:  [默认,香港,台湾,日本,新加坡,美国,其它地区,全部节点,自动选择,直连]

  - name: 国内
    type: select
    proxies:  [直连,默认,香港,台湾,日本,新加坡,美国,其它地区,全部节点,自动选择]

  - name: 其他
    type: select
    proxies:  [默认,香港,台湾,日本,新加坡,美国,其它地区,全部节点,自动选择,直连]

  #分隔,下面是地区分组
  - name: 香港
    type: select
    include-all: true
    exclude-type: direct
    filter: "(?i)港|hk|hongkong|hong kong"

  - name: 台湾
    type: select
    include-all: true
    exclude-type: direct
    filter: "(?i)台|tw|taiwan"

  - name: 日本
    type: select
    include-all: true
    exclude-type: direct
    filter: "(?i)日|jp|japan"

  - name: 美国
    type: select
    include-all: true
    exclude-type: direct
    filter: "(?i)美|us|unitedstates|united states"

  - name: 新加坡
    type: select
    include-all: true
    exclude-type: direct
    filter: "(?i)(新|sg|singapore)"

  - name: 其它地区
    type: select
    include-all: true
    exclude-type: direct
    filter: "(?i)^(?!.*(?:🇭🇰|🇯🇵|🇺🇸|🇸🇬|🇨🇳|港|hk|hongkong|台|tw|taiwan|日|jp|japan|新|sg|singapore|美|us|unitedstates)).*"

  - name: 全部节点
    type: select
    include-all: true
    exclude-type: direct

  - name: 自动选择
    type: url-test
    include-all: true
    exclude-type: direct
    tolerance: 10

rules:
  - GEOIP,lan,直连,no-resolve
  - GEOSITE,github,Github
  - GEOSITE,twitter,Twitter
  - GEOSITE,youtube,YouTube
  - GEOSITE,google,Google
  - GEOSITE,telegram,Telegram
  - GEOSITE,netflix,NETFLIX
  - GEOSITE,bilibili,哔哩哔哩
  - GEOSITE,bahamut,巴哈姆特
  - GEOSITE,spotify,Spotify
  - GEOSITE,CN,国内
  - GEOSITE,geolocation-!cn,其他

  - GEOIP,google,Google
  - GEOIP,netflix,NETFLIX
  - GEOIP,telegram,Telegram
  - GEOIP,twitter,Twitter
  - GEOIP,CN,国内
  - MATCH,其他
使用 Docker Compose 构建容器
Step 1 : 创建相关目录
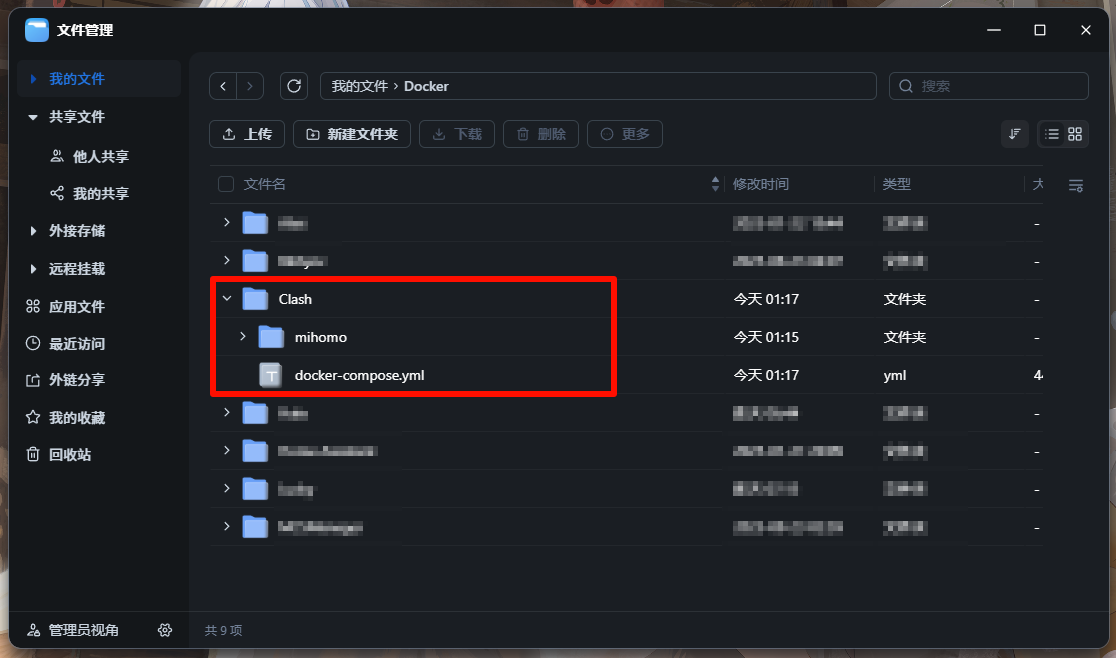
创建一个文件夹,用于保存配置文件和 docker-compose.yml 文件。在改文件夹下创建 mihomo 子文件夹用于存放上文撰写的配置文件 config.yaml,记住该文件夹位置,用于填写下文中 ${你希望存储程序配置的目录} 项
[!cite]+ 例如我的目录:
Docker/
└─ Clash/
   └─ mihomo/
      └─ config.yaml
Step 2 : 创建 Docker Compose
配置 Docker Compose 文件模板:
version: '3'

services:
  metacubexd:
    container_name: metacubexd
    image: ghcr.io/metacubex/metacubexd
    restart: always
    ports:
      - '9097:80'

  mihomo:
    container_name: mihomo
    image: docker.io/metacubex/mihomo:latest
    restart: always
    pid: host
    ipc: host
    network_mode: host
    cap_add:
      - ALL
    volumes:
      - ${config.yaml所在目录}:/root/.config/mihomo   #将“${config.yaml所在目录}”替换为上文用于存放 config.yaml 文件的目录
      - /dev/net/tun:/dev/net/tun
[!cite]- 例如我的配置:
version: '3'

services:
  metacubexd:
    container_name: metacubexd
    image: ghcr.io/metacubex/metacubexd
    restart: always
    ports:
      - '9097:80'

  mihomo:
    container_name: mihomo
    image: docker.io/metacubex/mihomo:latest
    restart: always
    pid: host
    ipc: host
    network_mode: host
    cap_add:
      - ALL
    volumes:
      - /vol3/1000/Docker/Clash/mihomo:/root/.config/mihomo
      - /dev/net/tun:/dev/net/tun
配置完成后保存为docker-compose.yml 文件,并将该文件保存至上文创建的用于存放配置文件的目录
[!cite]+ 例如我的目录:
Docker/
└─ Clash/
   ├─ mihomo/
   |  └─ config.yaml
   └─ docker-compose.yml
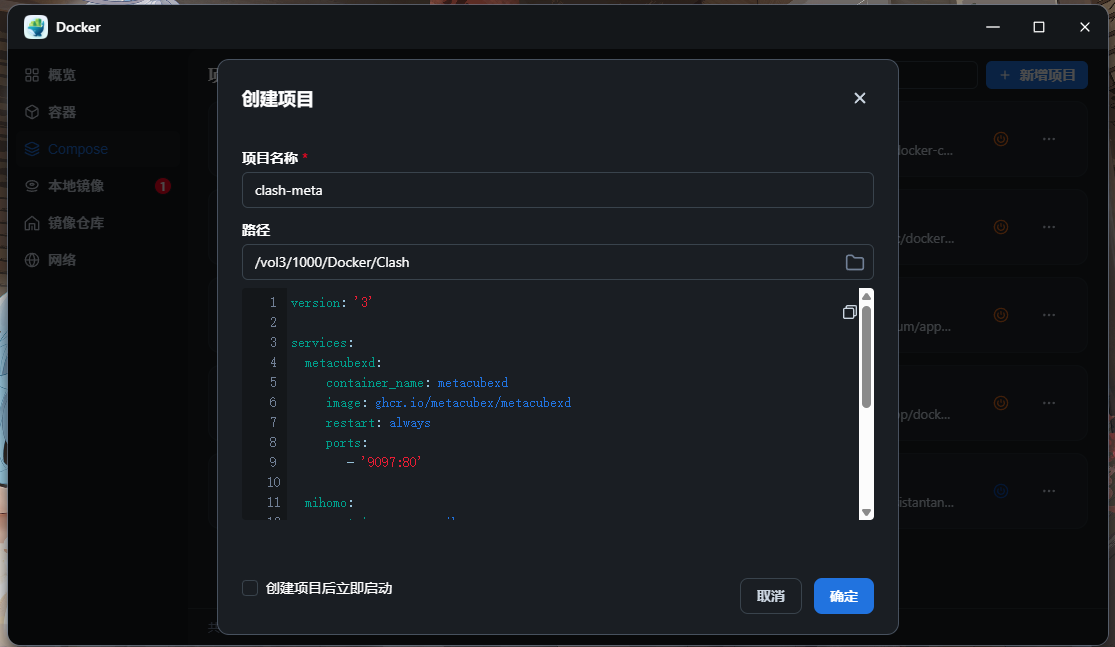
桌面打开Docker,点击侧栏 Compose -> 新增项目
项目名称 随意,例如我填写
clash-meta路径 选择上文创建的用于用于保存配置文件和
docker-compose.yml文件的目录
此时会弹窗 “所选的的路径已包含 docker-compose 配置文件”,点击 “确定” 即可。此时系统会自动导入 Compose 文件
[!cite] 例如我的实践:
点击 “确定” 创建后启动该 Compose
如容器 mihomo 日志中出现如下报错:
level=error msg="can't initial GeoSite: can't download GeoSite.dat: Get \"https://github.com/MetaCubeX/meta-rules-dat/releases/download/latest/geosite.dat应将 mihomo 配置文件
config.yaml中该部分地址改为仓库中列出的其他下载地址 \":geox-url: geoip: "https://github.com/MetaCubeX/meta-rules-dat/releases/download/latest/geoip-lite.dat" geosite: "https://github.com/MetaCubeX/meta-rules-dat/releases/download/latest/geosite.dat" mmdb: "https://github.com/MetaCubeX/meta-rules-dat/releases/download/latest/country-lite.mmdb" asn: "https://github.com/MetaCubeX/meta-rules-dat/releases/download/latest/GeoLite2-ASN.mmdb"
如容器运行失败,并在容器日志中提示如下报错:
level=fatal msg="Parse config error: rules[512] [GEOIP,CN,DIRECT] error: can't download MMDB: context deadline exceeded"可以前往该仓库下载
geoip.metadb等文件,并将其上传到与config.yaml相同的目录内再重新运行容器即可
Step3 : 终端启动/关闭项目方法
# 先 cd 到 docker-compose.yml 所在路径
# 启动项目
sudo docker-compose up -d
# 关闭项目
sudo docker-compose stop
Web UI 使用指南
浏览器中输入 http://<NAS的IP>:9097 访问 metacubexd 界面
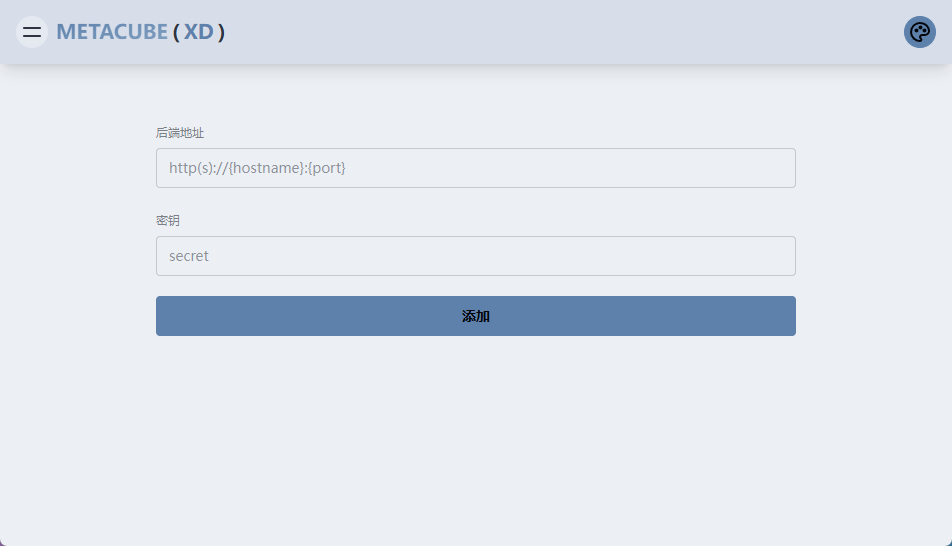
在 “后端地址” 栏填入http://<NAS的IP>:9090 ,“密钥” 栏留空,点击 “添加” 便可监看和管理 mihomo 的各项配置(配图中ip地址写错了)
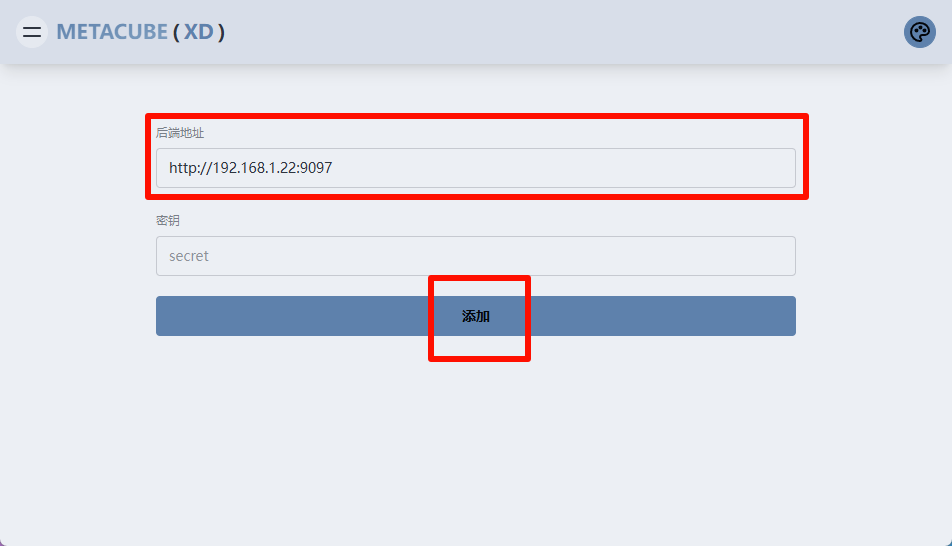
若在前文中修改了 webUI 访问端口和外部控制端口,请自行替换为自己设置的端口号。
如果你使用 metacubexd 更改了一些设置,那将只会在 mihomo 的本次运行生效,重启 mihomo 会将所有设置重置为你第一步在 config.yaml 中所填写的配置
至此已搭建完成,在需要使用网络代理的地方(具体见 Q&A)在代理选项内填入 设备IP:7890 即可使用
Q:“在需要使用网络代理的地方填入”是指填入哪
A:包括但不限于:各系统的系统代理(如 Windows 设置中的代理设置,手机 WiFi 的代理设置)、Linux 中环境变量的 http_proxy 等代理字段、各软件内部的代理设置等。
对于 系统代理,以 Windows 举例,并非所有软件都会走系统代理,这种时候你需要查看应用内是否能设置代理;若没有相关选项且应用本身不走系统代理则你需要考虑其他方法让 mihomo 来接管流量,不过这些就不在这篇教程的范畴内了。
如果你希望 mihomo 接管 docker 宿主设备本身 的所有流量,你可以参考我的教程启用 TUN 模式
如果你希望作为路由设备使用,比如你可能在其他地方见过的将网关指向该设备的用法,你可以配置 透明代理,这同样不在这篇教程的范畴中,但我会推荐你在路由设备中使用 ShellCrash (通用)或者 OpenClash(仅限 OpenWRT),但详细的使用方法请自行探究。



评论区